
Well. A girl can NEVER have too many tools. Nope. Never. And Grandad always told me to invest in the best I could afford, and assume I would grow into the tool. I didn’t quite understand what he meant at the time..
So. One of my customers messaged me…’I love my Star Trek studs, but wondered if you had ever thought about making some Harry Potter, Deathly Hallows ones?’
Of course I hadn’t. HP, as enjoyable as I found the movies and the book and the Lego PSX games, isn’t really in my Venn Diagram of geek. I looked at our box set. Nothing. I’d borrowed the books (virtually) from the library, so had nothing to use there, and had to resort to the interweb.
There are lots of images, but this seemed to be what was needed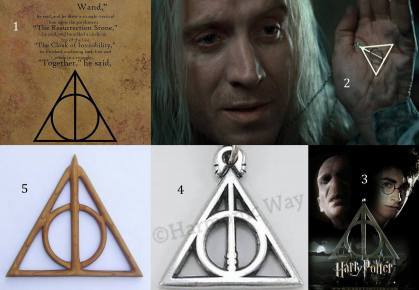 . I sent it off to my customer, to see if I was on the right track, and she asked me to try and make some studs, as small as the smallest of my ST ones. Now these, really are teeny. They are 7×5.5mm and I make them using Art Clay Silver, and a mould I made from a prototype I sculpted.
I knew that this was going to be too awkward to make in that way: I was going to need to cut my silver wire and solder it. Unless I wanted to saw it from sheet, but I prefer a more dimensional finish than that.
Now. Each of these elements has a meaning. You can see what that is in the first pic – the Triangle represents the Cloak of Invisibility, the ring the Resurrection stone set in Dumbledore’s ring and the line the Elder Wand (again, Dumbledore’s). It’s always important to me to try and reflect the meaning behind a commission, so I let that pootle away in my head whilst I got over excited and started a pair, and then, when I completed them sent off the pic to my customer. Lesson learned here?! ALWAYS REFER TO THE BRIEF. Especially if you are like me, with the attention span of a chicken.
I had reversed the ring and the triangle. You can see that failed pair in the final photo, along with the correct version.
Hash-Tag IDIOT. Still. Having the corners of the triangle so visible means that I can warrant the purchase of my new tool.. Skippetty-skip.
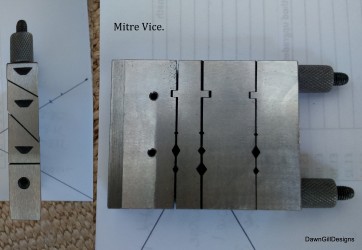
It was the second most expensive item I’ve bought, after Mr Tumnus, my Ultralight. It is a mitre vice. It is used for gripping and cutting wire, sheet and tube metal. It has fab little grooves in it all the way through, to avoid crushing the tube.
 It is the second most expensive item I’ve bought, after Mr Tumnus, my Ultralight.
It’s awesome.
I can line up the wire in the angles, at 90, 45, 60 or 30 degrees. The finish I can get using this is outstanding. It meant I could saw and file each corner perfectly.
 Of course. I know that the inside of each corner should be 60 degrees for a triangle like this, but maths has never been my strong point.
2 hours later, with a lot of swearing and close to tears, I have plenty of tiny bits of beautifully mitred 1.2mm wire, that would make a lovely honeycomb. IF THAT WAS WHAT I WANTED
Then. I went out the room in a strop and made something else. Whilst doing that, I realised that if I simply cut one of the internal corners, and laid it flush to the other wire, and then sawed the excess afterwards, I’d have it nailed.
Yup. I understand now that I could have cut the pieces to 30 degrees and placing the two together would make a 60 degree corner (would it, I don’t really know that. I’m still guessing), but this worked for me. I laid them out on my honeycomb board, with a 5mm jumpring I’d made from 0.8 in the centre, butted them up, pinned the jumpring, and whoosh. They soldered beautifully. Plain sailing thereafter.
I should have taken piccies, but I was so delighted that they worked, I just cracked on. I’m putting them in my shop now, made to order, but I think I’ll make a couple of pairs just to keep my hand in.
Here they are, completed. I made them in two parts; hammering the triangle to give the impression of movement for the cloak, and taking the piece of silver that represents the wand right to the edge of reticulation when I soldered on the ear post, to give it a more organic and wooden feel. I then soldered the two together. As you can see, heaps better than my original attempt, a happy customer and I learned lots.

")


They’re lovely, Dawn. And I enjoyed the description of your process. What popped out at me was that the ‘experimenting’ is not that different to what we do in writing. I suppose that insight should have been obvious. Oh well, better late than never. 🙂
LikeLiked by 2 people
Thanks; DV says the same, and it’s how I do everything, some of my pals are proper planners, with graph paper n everything. Not me😉🌼
LikeLike
plotters and pantsers the world over!
LikeLiked by 1 person
Nice job! Like Andrea said above–the experimenting is very close to what happens with writing. Creative work ticks those boxes, no matter what kind you choose to do, eh? (As for justifying expensive toys, er tools, no problem there. I think I’ve probably got a masters in that… and hey, you can write em off 🙂 )
LikeLiked by 1 person
It’s pretty well how I do everything ; make a prototype (badly) first 😀
Ta. X
LikeLike
Pingback: ScrapHappy | DawnGillDesigns
Pingback: ScrapHappy March 2022 | DawnGillDesigns