ScrapHappy April 2024 – Poltimore House

This is a bit of a liberty with the scraphappy theme as I’m not sharing something I’ve made from scrap (it’s mostly been crocheted corals for The Snail Of Happiness this month) Instead I’m sharing something in an attempt to raise awareness. Poltimore House has an amazing history – with a central courtyard dating from early Tudor days of the 1550s, to an operating theatre from the early 20th century; it’s been a family home, a school, part of the local NHS (as recently as the 1970s) and a residential care home.

There was an arson attack in 1987 after which it was left to the elements and then in 2000 the slow and painful task of restoring it from scrap began. When I first saw the house there were plants growing from the windows. Since 2018 I have had the opportunity to exhibit my shinies at a number of events and I’m always amazed by the dedication and care that’s taken to restore the building and grounds sympathetically – proper lime plaster for example. It’s without a doubt the most atmospheric of the places I’ve had the privilege to spend time in, and it’s incredible how so much of it has stayed intact despite the lack of windows, roof and floors. In many of the rooms there’s original cornicing from the 1800s as well as the central courtyard and operating theatre.

One of the joys of being part of an event is knowing that my table fee isn’t just helping them to halt the decline, but it’s helping to ensure that heritage crafts and the specialist experts are still employed.

Last week some arsonists struck again and the house has again been ravaged. I’m sharing on Scraphappy day because this is the day that I get most traffic to my blog and there is very little I can do to try and assist with the raising of funds other than donate a little and help with the awareness campaign.

If you are interested you can read the Wiki summary of the property here: https://en.wikipedia.org/wiki/Poltimore_House visit the crowd funder here: https://www.crowdfunder.co.uk/p/poltimore-house-fire-appeal#start see the local news report about it here: https://www.itv.com/news/westcountry/2024-04-10/huge-fire-breaks-out-at-historic-manor-house-in-suspected-arson-attack?fbclid=IwAR2VnJqEKDKj43706W0gcObMd3JZVYVymlzLchqXbN7Q6TGWgPC6Wb7zV18

My photos aren’t very good at all so I’ve taken screenshots of some of the splendid ones taken by Paula Fernley Photography and shared by Poltimore House. I had the joy of setting up in the amazing courtyard this Christmas, and the video I took before opening is on my Instagram and Facebook pages on 19/11/23 : https://fb.watch/rrJRKsgqH0/

ScrapHappy is a group of bloggers, using their scraps in inventive and entertaining ways. There are lots of different disciplines, including quilt blocks, pincushions, bags, hats, socks or a sculpture. Anything made of genuine scraps is eligible to write about. If your scrap collection is out of control and you’d like to have the encouragement to convert them into something beautiful or useful, why not join in on the 15th of each month?

Email Kate at the address on her Contact Me page. You can also contact Gun via her blog to join.

Here are the links for everyone who joins ScrapHappy on occasion.

KateGun, EvaSue, Lynda,
Birthe, Turid, Susan, Cathy,  Tracy, 
JanMoira, SandraChrisAlys,
ClaireJeanJon, DawnGwen,
Sunny, Kjerstin, Sue LVera, Edith
 Ann, Dawn 2, Carol, Preeti, DebbieroseNóilinViv, Karrin, Amo, Alissa, Lynn, Tierney and Hannah

Posted in Uncategorized | 6 Comments

ScrapHappy March 2024

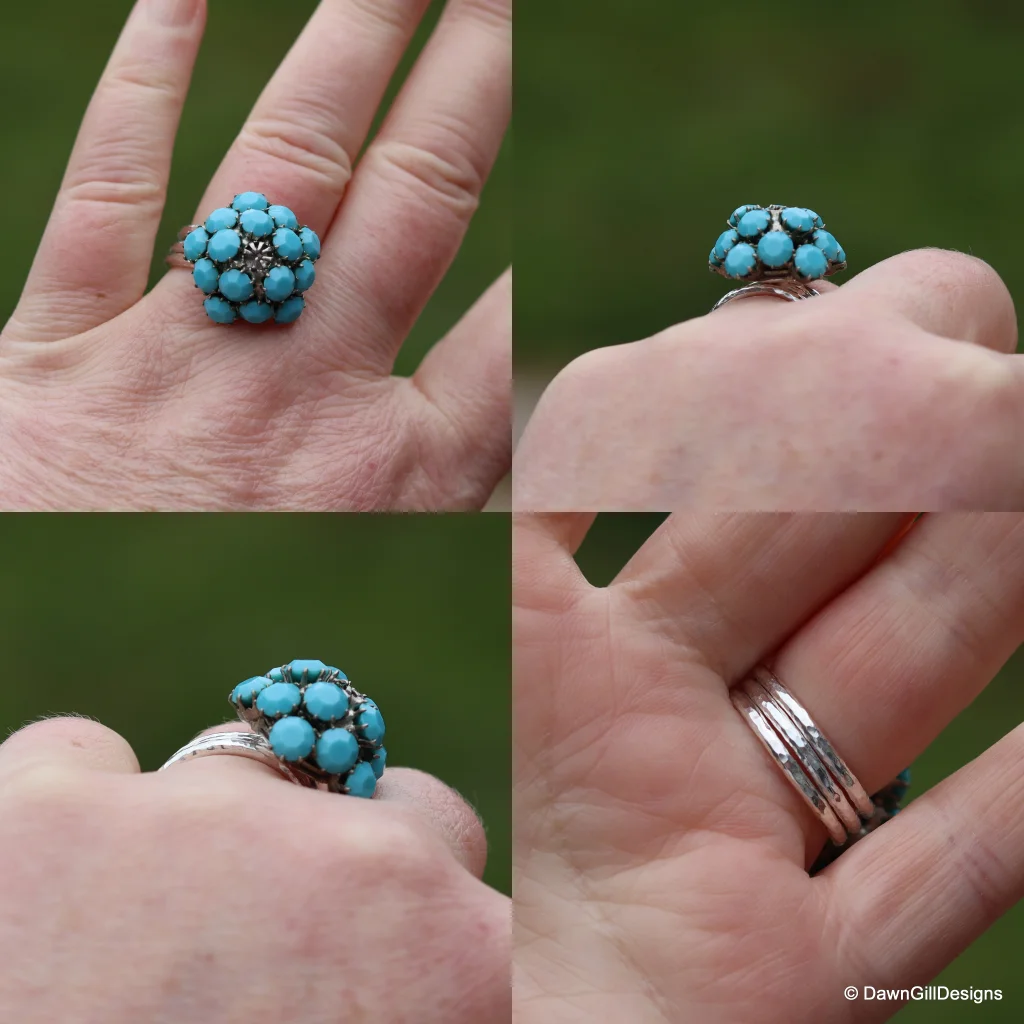
This year I’m actively participating in #MarchMeetTheMaker. It’s something organised by Joanne Hawker each year and previously I’ve joined in only to share and find new makers. It’s fun, but quite a challenge. Coincidently the prompt for the 15th March is Challenge, and of course, that works brilliantly with #ScrapHappy. This month’s scrap that I’m sharing is the reworking of a ring.

The thing about jewellery is that more often than not the value isn’t intrinsic, but emotive, and this piece embodies that. Owned by my customer’s mother, it’s something she wears because it makes her feel connected, but because it’s a traditional split shanked adjustable band, every time she wears it, it catches on something. It’s made from faux turquoise and a base metal, but she loves it.

We decided that I’d make a new shank and give it a cup and peg, so that I could epoxy the original to the new base. This means that I didn’t need to spend much time on it, that the new ring would be super comfy and that no heat would go near the original (really important if I don’t know what the alloy or ‘stones’ are made from.

As you know if you’ve followed my social media, when I have something special to make for someone, I like to share progress photos showing their piece being made, and here are the photos that go with this.

Firstly, saw off the old shank and file the burrs. Measure the back of the ring so I know the size I need to make the cup, which I made from a piece of sterling that wibbled when I ran it through my mill. That needed filing after sawing, and then annealing so I could dome it to the same profile as the back of the ring. Drill a hole all the way through the centre of the cup, the exact diameter of the wire I’m using as a peg (yes, an offcut) and then solder it. It looks really wonky on the solder block – but that’s cos I had to let go of the tweezers to hold my camera! Drill a hole the same diameter into the back of the ring, and solder the cup with it’s peg to the new shank I made (this shank is new – albeit already recycled – sterling). Clean and polish and then, utilising a prosecco cork – the wires create perfectly sized grooves to hold the elastic band from a bunch of spring onions – use 2 part epoxy to fix the ring to the setting. Please know that I don’t usually use glue when making jewellery, but sometimes it’s the only thing that one can do 😉

I also made a pair of stacking bands to go with it, to try and reduce the amount of spinnage that’s inevitable with a ring that has such a sticky out (technical term!! ) top

ScrapHappy is a group of bloggers, using their scraps in inventive and entertaining ways. There are lots of different disciplines, including quilt blocks, pincushions, bags, hats, socks or a sculpture. Anything made of genuine scraps is eligible to write about. If your scrap collection is out of control and you’d like to have the encouragement to convert them into something beautiful or useful, why not join in on the 15th of each month?

Email Kate at the address on her Contact Me page. You can also contact Gun via her blog to join.

Here are the links for everyone who joins ScrapHappy on occasion.

KateGun, EvaSue, Lynda,
Birthe, Turid, Susan, Cathy,  Tracy, 
JanMoira, SandraChrisAlys,
ClaireJeanJon, DawnGwen,
Sunny, Kjerstin, Sue LVera, Edith
 Ann, Dawn 2, Carol, Preeti, DebbieroseNóilinViv, Karrin, Amo, Alissa, Lynn, Tierney and Hannah

Posted in MarchMeetTheMaker, Uncategorized | Tagged , , , , , , | 22 Comments

ScrapHappy February 2024 – Needle Tidies

I’m knitting now, and loving it. As a slight Brucie-Bonus I’m discovering new things I need, that I can utilise my scrap for. Here’s the latest.

As I’ve mentioned before, I make and sell quite a few HookerRings, and I buy this (indeed all my recycled sterling) by the metre, which enables me to get a tiny discount on the bullion price. That means there’s always a small bit left over, which I’ve used for various things in the past. Depending on if I’ve made standard/chunky style or small / large hooker rings, I’m left with a 1.5-2.5cm offcut at the end of my strip of sterling.

Now I’ve started knitting properly, I’ve discovered that the diameter marking on my preferred needles (bought from my favourite needle supplier Cricklade Crafts) rubs off really quickly which was annoying. I’m probably knitting too tightly and shoving too hard, but it’s too late for my 4 and 3.75mm needles now!

I also found having to ferkle about in my bag to locate all the same sized DPNs even more annoying, especially if we were sitting on the sofa and trying to watch something on the TV. 

I need to file and sand all the edges of each strip of silver to ensure it’s as smooth as butter when in use, so I tend to chop up the long strip into the appropriate lengths for individual hooker rings, to keep them manageable, and then I mark the excess, countersink a divot for the drill, drill the hole, saw off the excess and only then do the filing and sanding of the two extra ends. Then I sand and polish the flats, anneal and pickle and set aside the hooker rings so I have a good quantity of blanks ready for restocking / custom orders

That leaves me the offcuts, which are now drilled, smooth and ‘dead soft’ ready for stamping. I tape the offcut to my block and use a punch and grandad’s hammer to bash the number in – I hold the punch more vertically than the photo suggests when I do this!!

More polishing, then I attach the appropriate sized jumpring, that I’ve already soldered closed – if I’ve had a good soldering day then there’s minimal clean up for these, but usually there’s some filing and soldering to do here too. It’s crucial with jewellery and items such as these that there are no burrs or scratchy parts – you’d think that would go without saying, but I’ve been surprised just how often I come across silverwork that’s not been smoothed to the standard I’d like

It’s important that I then give them all a really good and long tumble in Betty-The-Barrel-Polisher as it helps to ensure that there are no residual burrs and it hardens everything up.

Because I made these for myself, I applied some Liver Of Sulphur to pick out the numbers

The range shown are on my personal DPN and interchangeable KnitPro Symfonie needles

Credits to Norman of Nimble Needles for the genius idea of the coils; to Elizabeth Smith for the Rosanna cardigan and to Fiona of Kosy Kitchen Fibres for the glorious 50/50 merino/silk 4ply superwash

And here’s where you can order (if you so wish!) for yourself / a loved one. They come individually or slightly discounted if you order a set, inside a small aluminium tin, with a silicone coil.

ScrapHappy is a group of bloggers, using their scraps in inventive and entertaining ways. There are lots of different disciplines, including quilt blocks, pincushions, bags, hats, socks or a sculpture. Anything made of genuine scraps is eligible to write about. If your scrap collection is out of control and you’d like to have the encouragement to convert them into something beautiful or useful, why not join in on the 15th of each month?

Email Kate at the address on her Contact Me page. You can also contact Gun via her blog to join.

Here are the links for everyone who joins ScrapHappy on occasion.

KateGun, EvaSue, Lynda,
Birthe, Turid, Susan, Cathy,  Tracy, 
JanMoira, SandraChrisAlys,
ClaireJeanJon, DawnGwen,
Sunny, Kjerstin, Sue LVera, Edith
 Ann, Dawn 2, Carol, Preeti, DebbieroseNóilinViv, Karrin, Amo, Alissa, Lynn, Tierney and Hannah

Posted in #HookerRing, #StitchKeeper, processes, ScrapHappy, silver, Uncategorized | 30 Comments

Creating the scrap

I shared earcuffs made with the offcuts of spinner rings in July’s Scraphappy (I’ve just begun to restock my website), and having just completed a commission for a 21st birthday, I thought you might like to see how I end up with those small pieces of sterling.

When someone comes to me for a commission, I like to honour the tradition of a small, artisan maker’s workshop – when I was a child our tiny village had both a blacksmith and a saddler. I feel I can just about remember the forge or at least the impressions of the noise and smell; but Alan with his saddler’s workshop lived opposite our home, so I would often see him working on leather items through their window adjoining the road. The people for whom he was making would visit and so be able to see the progress of their pieces. I want to channel this, and I also think it helps to make the process of shopping small and independant something that is more exciting for the customer, which – I hope – will encourage them to seek out other small makers, be they embroiderers, leatherworkers, potters, cabinet makers, or yes, jewellers 🙂

For me, this means that I document the processes, creating collages of photos, uploading them to a shared Google drive folder to which my customer has access, and also in the case of a gift, the recipient. Sometimes the technology is a little challenging for us, but usually it’s something that adds to the experience.

This then, is a summary of how I made the ring shown in the collage at the top of this post – a static gemset spinner style ring, using recycled sterling silver and a rosecut asymmetric green sapphire she selected from my stash.

As you know, any item made from precious metals in the UK must have been approved by an Assay Office if it’s of a significant weight. As you also know if you’ve been reading for a while (see here) merely being stamped 925 means nothing; you should look for the full hallmark that includes the sponsors mark, the assay office which tested the piece, the fineness / purity of the piece and (optional) the year and any commemorative markings. Makers are permitted to send incomplete items to their Assay Office, provided we include all the elements that will be used when completing – so that’s all metal components; embellishments, solder etc. I usually include a few ring blanks in each package to keep timescales and costs to a manageable level

01 – The ring blanks are returned from London Assay, having passed their tests and had the 2023 full UK hallmark applied.

I check there’s enough silver for the ring using verniers, and choose appropriate bezel wire from the stash that London have already assayed. I then wind a strip of bezel round the sapphire to calculate the correct length

02 – File one end of the bezel to a right angle using my mitre jig, coil around the stone again, mark, cut, file that end to right angle, and bend the metal so that the joint is perfectly flush in all dimensions before soldering. If you zoom in you’ll see a tiny red spot on the solder brick which is the ‘hard’ solder chip – ‘hard’ has the highest melting temperature. Remember that all the solder used has also been checked by the Assay

03 – Check fit  (put this in the wrong place on the collage!),  file the base of the setting perfectly flat, choose an offcut of silver (previously checked by assay office) and solder the bezel wall and base together; again using hard solder, but this time I’ve balled it up first.

04 – saw out the bezel, use rolling mill to flatten 2mm wire to profile for outer shank (again already approved by assay)

05 – saw both shanks to size, anneal using SmeltyMelty my hydrogen powered Aquaflame torch (electric from our PVs #SmugFactor!), drop the now oxidised silver into the pickle pot to clean. Whilst that’s cleaning, file the edges of the bezel setting so the base is perfectly flush to the walls

06 – file the top of the bezel to the correct height for the stone. Using dental floss to make sure I can get the stone back out, I check the fit (there’s a lot of checking of fit !) Shanks are now clean of oxidisation and can be soldered. Bend the inner shank in the same way as I did the bezel

07 – solder the inner ring, again using hard solder. True it up on a steel triblet, then check it for size, file, sand the joint and the edges. Repeat the process with the outer shank, and solder on the bezel setting. Clean both in the pickle

08- now to fix the outer to the inner so there’s no spinning, and no excess solder flowing over the textured inner ring. To achieve this, I sweat soldered, (using ‘easy’ solder – see the blue chip? with a lower melting point than the ‘hard’ solder) in a couple of places on the outer ring, then filed off all excess to reduce the risk of it flowing where I don’t want it. Using iron binding wire I tie the two together, to align as best as possible, and then add some special heat protection paste to the bezel – I don’t want the heat from the blowtorch to melt any of the other solder joints, as the pieces will come apart, and I don’t want to have to remake it! Remove the binding wire before pickling, otherwise the silver will be copper plated

09 – after pickling, wrap the ring in washi tape to protect it from scratches and scuffs, and file a slight angle to the top of the bezel, to thin it and make it push over neatly. Use a doming punch to flare the edges, flipping from one side to the other repeatedly, going at it gently. Polish

10 – set the stone – add fresh washi tape, put renaissance wax into the setting to keep it from tarnishing behind the stone, and push the bezel walls over. Note I’ve a scrap of leather from my bookbinding days to cushion the jaws of the ball vice. Burnish the top of the bezel walls and polish again. Then time to add the patination. Paint on liver of sulphur solution and heat (I use the kettle for this) to achieve the grey that was asked for.

Finally, polish off the excess patination and – boom!! The piece is finished 🙂

This may not be a scraphappy post, but if you haven’t been an looked at the blogs of the rest of the gang, you really should. Find them ath the links below, wiht new posts due on the 15th of each month

KateGun, EvaSue, Lynda,
Birthe, Turid, Susan, Cathy,  Tracy, 
JanMoira, SandraChrisAlys,
ClaireJeanJon, DawnGwen,
Sunny, Kjerstin, Sue LVera, Edith
 Ann, Dawn 2, Carol, Preeti, DebbieroseNóilinViv, Karrin, Amo, Alissa, Lynn, Tierney and Hannah

Hallmarking act Find your own glorious rosecut stones from my favourite seller Jane here

Posted in #SmeltyMelty, Aquaflame,, Gems, Law, Hallmark, Meet The Maker, Other Blogs, processes, resources, ScrapHappy, silver, Tech Tip, tutorial, Uncategorized | 12 Comments

Scraphappy August 2023 – fresh balls please

I’ve been working on lots of ‘serious’ jewellery commissions recently, so headspace for coming up with projects to use my scrap in a new and inventive manner hasn’t been as available as I’d like.

This month we have another variation on the melting of offcuts and the creation of balls. Hope this isn’t too dull an offering 😉

I’ve already banged on about my Astrid rings, stud earrings and Budleigh pebble range, but I’ve now added balls to bangles in a different style, and as a bonus there’s a pair of drops fully from scrap

As usual I smelt down some weighed scrap into balls, then I file a flat area on to soldered and cleaned medium weight bangles, file a corresponding flat area to the back of my balls and I solder them to the bangles.

That sounds very straightforward, but as you can see from the photos – I have to do a certain amount of jiggery-pokery with tweezers to ensure that everything stays in the correct position.

I have a really handy guide to finding even points on a circle from Lucy Walker (see link later) so before I do any of the filing I work out how many balls I want on each bangle, sort out the best matching ones and then mark up the areas where I’ll attach them.

Because I like my shinies to be distinctive, I then add little dimples to the body of the bangle by using a variety of ball burrs, sand and polish off any sharp edges finally appling some liver of sulphur for patination.

These all need to go for assay, at London Assay Office as each bangle is over 7.78g of sterling, and they just came back last week. It’s been a particularly overcast July and August here in Devon, so photography has occurred whenever I get a chance, which I am sure entertains our neighbours.

I’ve found these to be quite popular, so they are now a regular offering, and can be found at fairs and on my website

And then, these earrings are properly scrap – small offcuts of 0.8mm wire for the ear wires, and a couple of balls that I’ve hammered flat, and then textured with Grandad’s old pin hammer. I used Lucy’s handy guide again to help line up the earwire (see the green mark below the red solder chip? ) I think I’ll keep these as an early birthday present.

Resources https://lucywalkerjewellery.com

My earlier blog posts demonstrating how I make the balls

Video on YouTube of #SmeltyMelty actually melting some balls from the end of jumpring coils

ScrapHappy is a group of bloggers, using their scraps in inventive and entertaining ways. There are lots of different disciplines, including quilt blocks, pincushions, bags, hats, socks or a sculpture. Anything made of genuine scraps is eligible to write about. If your scrap collection is out of control and you’d like to have the encouragement to convert them into something beautiful or useful, why not join in on the 15th of each month?

Email Kate at the address on her Contact Me page. You can also contact Gun via her blog to join.

Here are the links for everyone who joins ScrapHappy on occasion.

KateGun, EvaSue, Lynda,
Birthe, Turid, Susan, Cathy,  Tracy, 
JanMoira, SandraChrisAlys,
ClaireJeanJon, DawnGwen,
Sunny, Kjerstin, Sue LVera, Edith
 Ann, Dawn 2, Carol, Preeti, DebbieroseNóilinViv, Karrin, Amo, Alissa, Lynn, Tierney and Hannah

Posted in processes, resources, ScrapHappy, silver, Stuff I love, tutorial, Uncategorized | 24 Comments